


Rendered insulation was used at the back of this Victorian house but there were problems to overcome …
The approach to insulating the rear walls at Midmoor Road has been very different from our approach to the front, where we carefully lined the internal faces with phenolic insulation and overlaid it with oriented strand board to from an air-tight layer.
That internal lining system was driven by a desire (and planning need) to avoid impinging what is an attractive and well-built streetscape.
At the rear however we were presented with a much more workaday elevation. It and some of its neighbours had already been ’mucked about with’ as is often the case at the backs of these houses.
The internal dimensions of the rooms within the rear part of the house were also much tighter than at the front so taking any space away for insulation would have affected the usability of those spaces.
The other point worth noting is that the amount of external envelope at the rear far exceeds the almost flat front of the house. To offset the effect of this large surface area we were keen to strive for the lowest possible U-value we could achieve.
All the points above led us to pursue a rendered insulation solution though it is important to note that we had to solve one two practical issues in order to make it feasible.
As in commonly the case in houses of this period the soil stack was fixed to the outside of the rear elevation, in other words in the same plane as the insulation. Simply burying it within the insulation would have made maintenance almost impossible and would have compromised the insulation.
So we moved the stack to the inside face of the wall, a move which actually made the new plumbing connections easier and reduced the number of times the stack passes through the air tightness plane.
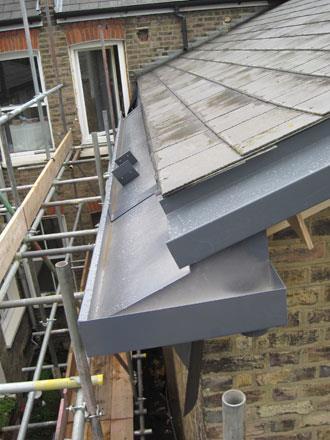
The other big issue was how to finish or stop the insulation at the top of the wall. Victorian houses often have a shallow ’clipped’ eaves and verges which offers no overhang to protect any insulation below. We could have adjusted the roofing in these instances but that would have meant stripping the roof tiles in order to extend the rafters at the eaves and sprockets at the verge.
That would have cost half as much as the wall insulation again, and besides the roof had been re-slated only a few years before.
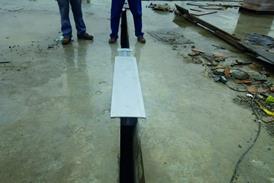
So we came up with idea of making a super wide gutter that could be fixed at the eaves and that would act as a giant stop bead for the insulation.
Similarly at the verge a flashing/gutter piece was also feasible. Working with Brian Cherry of JWD rainwater products, this idea was turned into reality using powder coated folded aluminium sections, coloured to match the existing man made slates.
The system uses two standard sections for the gutter and flashing and is completed with two stop end types and a corner junction. It was fitted to the edge of the rear roof a few weeks ago in readiness for the installation of the external insulation.
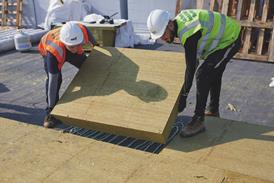
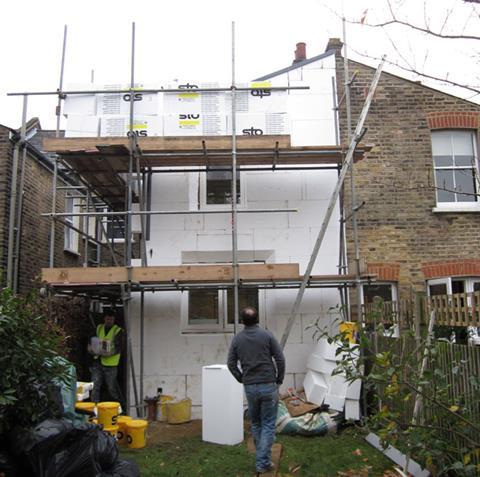
This week, after a little delay awaiting material supply, the insulation sub contractor Drens arrived on site to start installing the rendered insulation.
We have chosen a Sto product mainly on the basis that they were the only supplier who could provide a very low U-value (0.12 W/m2K) that used a simple expanded polystyrene (EPS) system known as ’turbo-fix’.
EPS blocks that are 280mm thick (yes 280mm) can be fixed to the external brickwork using an expanding foam adhesive.

The blocks are about a 1m x 0.5m in size and a fitted in a giant brick bond fashion. They can be easily cut and shaped on site to accommodate irregularities in the wall and to achieve special shapes and profiles.
The surface irregularities of the wall at Midmoor Rd have meant that some areas of wall needed to be ’dubbed’ out a little with a levelling compound.
This has meant that each block will also receive one mechanical fixing as a ’belt and braces’ measure to ensure long term stability. Even so it will only take about four days to install the insulation before the render coats are applied next week.
The mechanical fixings will be well counter sunk into the blocks to minimise thermal bridging with the hole being plugged by expanding foam. All gaps between the blocks and behind them have been similarly filled to prevent any air movement within the insulation which could reduce its effectiveness.
The system will be rendered with a standard flexible mineral render that is just off white. The grit size will be about 1mm. The reveals to the windows (which have been splayed for better day lighting) will be finished in a special smooth bright white render to present a slightly more refined appearance reminiscent of the treatment on Victorian and Georgian reveals.
The insulation laps over the fixed frames of the windows to reduce the visual bulk of the frames and alleviate the thermal bridge here.


No comments yet